

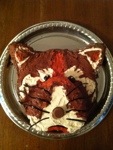
It’s Bea’s 9th! To celebrate, we created this Red Panda Cake! It’s a Chocolate Peanut Butter Lover’s Dream!!!

RED PANDA CAKE
Chocolate Peanut Butter Cake with peanut Butter Cream Cheese Icing
makes 2 9-inch layers or the 4 shapes required for a red panda cake
Equipment
- Baking Pans
- 2 9-in pans
- OR
- 1 11-in round baking pan
- 1 6-in heart-shaped or round baking pan
- 2 disposable aluminum pot-pie pans or 2 rounds of a cupcake tin
Ingredients
Chocolate Peanut Butter Cake
- 2 c all-purpose flour
- 3/4 c unsweetened cocoa powder [preferably dutch processed]
- 2 tsp baking soda
- 1 tsp baking powder
- 2 c sugar
- 1 tsp salt
- 1 cup buttermilk [or sour milk]
- 1/2 c vegetable oil
- 2 large eggs
- 1 tbs vanilla extract
- 1/3 c smooth peanut butter [we use no name 25% less sugar]
- 1 cup freshly brewed hot coffee
[Chocolate] Peanut Butter Cream Cheese Icing [Makes about 4.25 cups]
- 1.25 c light cream cheese
- .5 c butter
- 5 c icing sugar
- 1 tsp vanilla
- 1 c smooth peanut butter [we used no-name with 25% less-sugar]
- [5 ounces bittersweet chocolate melted & 3 tbs coffee]
Additional Needs Specific to the Red Panda Cake
- Gel icing colours: Copper Red, Black, White-White [Optional]
- 1 mini peanut butter cup
- 2 chocolate covered nuts
- Black Licorice Laces [or a tube of black pre-made icing or Chocolate peanut butter cream cheese icing placed in a piping bag]
- A picture of a favourite red panda face to use as a guide.
Instructions
Chocolate Peanut Butter Cake
- Preheat the oven to 350° F.
- If you are using them, mold the 2 disposable aluminum pot-pie pans into triangular ear shapes, raising the edges of the pans up [think of it as lifting up a collar] so that they will be as tall as your other pans and hold more batter.
- Spray each baking pan with baking spray.
- Line the bottoms of each pan with parchment paper cut to size.
- [Trace around the bottoms of the pan with a pencil to create a guide.]
- Spray the tops of the parchment with a bit of baking spray.
- Sift the flour, cocoa powder, baking soda and baking powder into the bowl of an electric mixer using a sifter or a wire-mesh strainer.
- Add salt and sugar to the bowl, and with the mixer set to low speed, beat for 30 seconds or so until combined.
- In a separate bowl, whisk eggs, buttermilk, oil, and vanilla.
- With the mixer set to low, add the wet mixture to the dry mixture and blend until just combined.
- Place the peanut buter in a large measuring cup and pour coffee over top.
- Whisk tihs mixture until the peanut butter is melted and fully blended with the coffee.
- Beat the coffee & peanut butter mixture into the cake batter until fully incorporated.
- You will have about 6 generous cups of batter when completed.
- Pour about 3-3.5 cups of batter into the largest pan, 1-2 cups of batter into the smaller pan, and less than 1 cup of batter into each of the small tins for the ears.
- Look to see that the level of batter is even in each of the pans. Adjust accordingly.
- Set the filled pans in the middle rack of your oven.
- Bake cakes for a total of about 30 minutes, until a butter knife inserted into the centres of the cakes comes out clean.
- [Today, our smaller cakes took 28 minutes, and our larger cake took 32 minutes.]
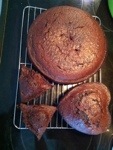
- Cool the cakes in their pans on top of wire racks for at least 30 minutes.
- Then, invert the cakes on the wire racks, remove the parchment circles, and cool completely.
[Chocolate] Peanut Butter Cream Cheese Icing
- In a mixer, blend the cream cheese and the butter.
- Add the vanilla and the peanut butter and combine until fluffy.
- Scrape sides of bowl occasionally.
- Slowly add the icing sugar until well combined.
- [For the chocolate version, add the melted chocolate and coffee and stir.]
RED PANDA CAKE CONSTRUCTION
- Prepare 1 recipe of Chocolate Peanut Butter Cream Cheese Frosting
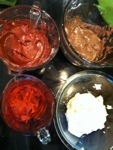
- Divide the Batch into 1 small bowl (about .5 c) and 3 larger bowls (about 1.25 c each)
- To the smaller bowl, add copper icing gel
- Leave one large bowl of icing beige or add white-white icing drops to brighten it a bit
- Add Copper, Red and Black Icing Gel to achieve a reddish brown colour in another large bowl.
- To the final large bowl, add 2 oz melted bittersweet chocolate and 1 tbs coffee and combine well, adding an additional dot or two of black icing gel if so desired.
- Remove the parchment from the cake bottoms and trim the tops of the cakes if so desired.
- Lay the large cake trimmed side down on a large serving platter.
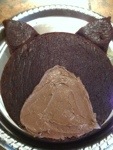
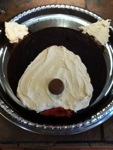
- Using the heart- (or small circle) shaped parchment you removed from the small cake as a guide or outline, spread the chocolate flavoured icing in an upside-down heart-shape towards the centre bottom of the of the 11 in cake.
- Place the smaller heart (or circle) cake trimmed side down upon the icing.
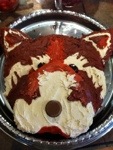
- Use chocolate flavoured icing to attach the ears, trimmed sides down, at the 2 and 10 o'clock points on the 11 in cake.
- Use the icings to decorate the cake as you please:
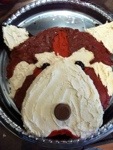
- It may seem counter-productive, but I began with the white icing and the copper icings as highlight colours, adding the darker reddish-brown colour afterwards.
- I placed the peanut butter cup as a nose and the chocolate covered nuts as eyes about half-way through the icing process in order to use them as guides for further icing and decoration.
- Finish by icing the outside edges or sides of the cake with the chocolate flavoured icing.
- Cut a few lengths of thin black licorice laces to use as whiskers.


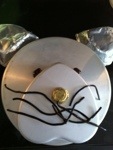


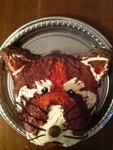
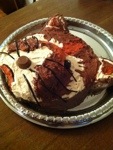
Celebrate, Slice and Enjoy!!!
Comments are closed.